ATS Attachment Store and File Transfer channels?
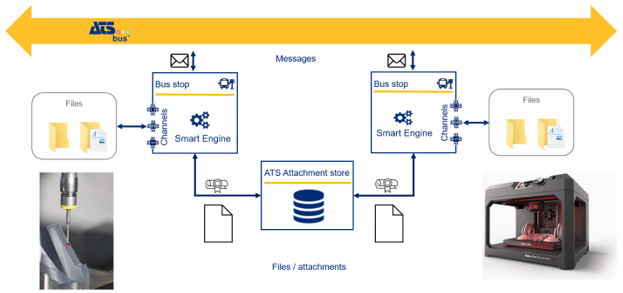
The ATS Attachment Store is a file sharing service that receives, stores, and delivers files via an encrypted interface. Every bus stop in ATS Bus has a file transfer channel that implements this interface allowing bus stops to exchange large files via the ATS Attachment Store. The reason for using the ATS Attachment Store is because the manufacturing service bus is unable to handle large files.
How does it work?
Each bus stop configures a File Transfer channel and channel messages. The File Transfer channel configures where to read the files from and where to write the files to (also known as input and output directories). The channel message configures the direction of the message for now.
Also, a topic is required. A topic is an identifier that is used to route the message between bus stops and their channel messages.
As soon as a file is ‘dropped’ in the input directory, one of the configured file transfer channel messages will pick it up and transfer it to the attachment store via an encrypted GRPC connection. The attachment store returns a unique ID when it successfully consumed the file. Then, the channel message creates a FileTransfer message object including the ID returned by the attachment store and publishes this as a ProcessFileTransfer message on the bus if there is an ‘PublishWithTopic’ action assigned to this channel message in the channel message handling configuration of the bus stop.
Now, the file is published on the bus and will be consumed if there are bus stops subscribed to the ProcessFileTransfer message for that configured topic. When subscribed, a bus stop will receive the ProcessFileTransfer message and it will export it to a FileTransfer channel message (that has its direction set to download). The FileTransfer channel message extracts the file details from the incoming message, collect the file from the attachment store and write it to the configured output directory.
How to configure the connection to the Attachment Store in ATS Bus
The location of the attachment store is identified by a connection string which can be configured in the Global settings section in ATS Bus Cockpit:
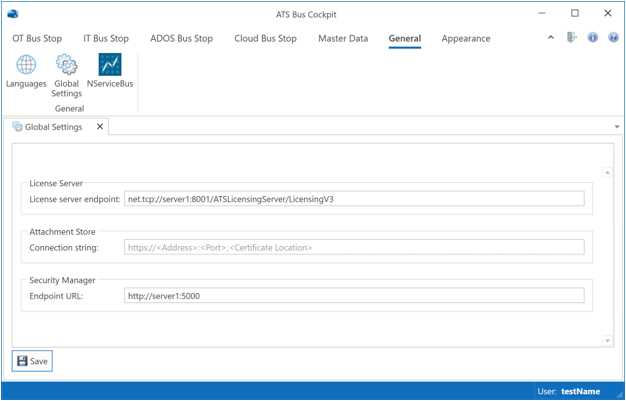
The connection string consists of a URL and a location to a client certificate. Both items are separated by a semi-column ‘;’. Ensure to use a hostname that is configured as DNS entry in the Subject Alternative Name of the Attachment Store TLS server certificate. Failing to do so will result in a lot of error messages raised by the file transfer channels.
ATS Bus requires a PEM formatted certificate to communicate with the encrypted endpoint of the ATS Attachment Store. Creating this certificate is explained at the last step in ‘Create a TLS certificate for the ATS Attachment Store using OpenSSL’.
How to configure the file transfer channels

Each bus stop has a file transfer channel, and each channel has the following configuration parameters:
Name: The name of the channel
Input files directory: The directory to read the files from that should be transferred via the attachment store.
Output files directory: The directory where files are stored that are coming from the attachment store.
Scan pattern: A wildcard that identifies the files in the input directory.
Error files directory: Files from the input directory that caused an error during processing.
How to configure the file transfer channel message
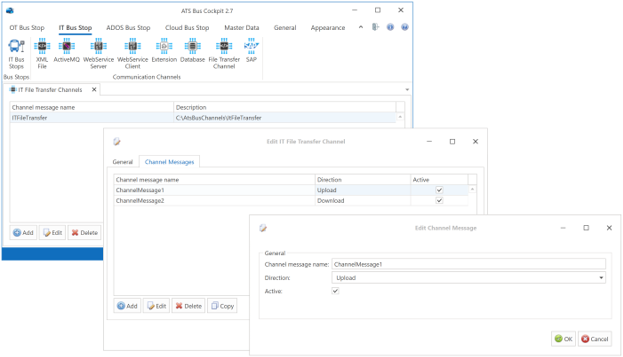
The channel message only configures the direction of the channel message.
How to publish a FileTransfer channel message as ProcessFileTransfer?

Open any of the bus stop configurations and navigate to the Channels tab
Select the FileTransfer channel
Navigate to the Channel Message Handling tab
Drag the PublishWithTopic action on top of the file transfer channel message that has its direction set to Upload.
Select a Topic for the PublishWithTopic action and close the dialog.
This publishes a ProcessFileTransfer message for a given topic as soon as the configured channel message processes a file.
How to create TLS server and client certificates for the ATS Attachment Store
OpenSSL is used to create the TLS certificate for the ATS Attachment store. The certificate is mandatory and used to encrypt the connection. OpenSSL It is a multi-platform tool that works on both Windows and Linux. OpenSSL is pre-installed on most Linux distribution but not on Windows. The Windows installation package for OpenSSL can be downloaded from: https://wiki.openssl.org/index.php/Binaries
Create a TLS certificate for the ATS Attachment Store using OpenSSL
Ensure OpenSSL is installed and functional.
Create a directory named ‘C:\ats_attachment_store’ and step into it using the following command: ‘cd \ats_attachment_store’
Create a text file named openssl.conf and add the following to it:
[req]
default_bits = 2048
default_md = sha256
default_keyfile = cert.priv_key
prompt = no
encrypt_key = no
distinguished_name = req_distinguished_name
req_extensions = req_ext
x509_extensions = req_ext
[req_distinguished_name]
commonName = "ATS Attachment Store"
[req_ext]
authorityKeyIdentifier = keyid,issuer
subjectAltName = @alt_names
basicConstraints = critical, CA:false
keyUsage = critical, digitalSignature,nonRepudiation,keyEncipherment, dataEncipherment
extendedKeyUsage = critical, 1.3.6.1.5.5.7.3.1
[alt_names]
# Uncomment the lines below when required
# Add the first DNS to the SAN
DNS.1 = YOUR.HOSTNAME
# Add another DNS to the SAN
#DNS.2 = YOUR.FQDN
# Add an IP address to the SAN
#IP.1 = YOUR.IP
Create the certificate signing request:
openssl req -config openssl.conf -new -out cert.csr
Check if the CSR contains the proper values:
openssl req -in test.csr -noout -text
Create the PEM formatted certificate:
openssl x509 -req -days 365 -extfile openssl.conf -extensions req_ext -in cert.csr -signkey cert.priv_key -out cert.crt
This command produces the following output:
Signature ok
subject=CN = ATS Attachment Store
Getting Private key
Convert the PEM formatted certificate and the private key to a PKCS#12 (.pfx) that is password protected:
openssl pkcs12 -export -out cert.pfx -inkey cert.priv_key -in cert.crt -password pass:YOUR_P@$$W0RD
Create a PEM formatted client certificate, without keys, for the ATS Bus bus stops:
openssl pkcs12 -in cert.pfx -passin pass:YOUR_P@$$W0RD -out client_cert.pem -nokeys -clcerts
Create a TLS certificate for the ATS Attachment Store using PowerShell
Execute the following command:
New-SelfSignedCertificate -DnsName <FQDN>, <Hostname> -CertStoreLocation “cert:\LocalMachine\My” -NotAfter “2030-01-01” -Subject "CN= ATS Attachment Store"
<FQDN> and <Hostname> are used to identify the host that hosts the attachmentstore, it should contain the hostname or fully qualified domain name of the host.
The certificate will be installed in the Personal location of the local machine’s certificate store.
Copy the certificate to the ‘Trusted Root Authority’ to ensure that the chain is trusted.
Export this certificate to a Base64 encoded file. This file can then be configured in the Connection string of the Attachment Store global settings in ATS Bus.
Create a client certificate from a Certificate that is already in the Windows certificate store
Find the certificate that should serve as a client certificate.
Export this certificate to a Base64 encoded file with the extension PEM. This file can then be configured in the Connection string of the Attachment Store global settings in ATS Bus.
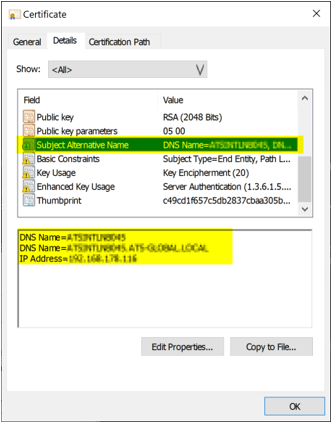
Hostnames in the SAN section of the TLS certificate
The following screenshot shows the server hostnames in the SAN section of the TLS certificate:
How to install the ATS Attachment store
The ATS Attachment Store is installed using an installer package.
Starting the installer shows the following dialog. Click Next to advance to the next step.
The ATS Attachment Store is a 64-bit application/service.
![]()
Provide or accept the installation folder and click Next.
![]()
In this dialog, the Server URL must be configured. The Server URL is the endpoint at which the ATS Attachment Store listens. The hostname part of the Server URL MUST also be listed as one of the DNS (or IP address) entries in the SAN section of the server certificate that is used by the ATS Attachment Store to encrypt the endpoint. The name ‘ServerDnsName’ in the screenshot should be listed as DNS name in the SAN section of the TLS certificate.
![]()
Select where to read the TLS certificate from, there are 2 options:
File system, select a PKCS12 file from the file system. The certificate should have a private key and password (see: How to create TLS server and client certificates for the ATS Attachment Store). Press Next after providing the certificate details.
![]()
(Windows) certificate store:
Use one of the following for store locations:
CurrentUser: Current user
LocalMachine: Local machine
Use one of the following for the store names:
My: The X.509 certificate store for personal certificates.
Root: The X.509 certificate store for trusted root certificate authorities (CAs).
TrustedPeople: The X.509 certificate store for directly trusted people and resources.
TrustedPublisher: The X.509 certificate store for directly trusted publishers.
The Subject Common Name identifies the certificate. Please ensure that a certificate with a unique CN is used otherwise the ATS Attachment Store might use the wrong certificate.
Allow Invalid?: Allows or disallows certificates that are past their expiry date or have an invalid chain.
Press Next after providing the certificate details.
![]()
Press Install to install the ATS Attachment Store.
![]()
The installer does not automatically start the service. Open the Windows Services manager and start the ATS Attachment Store service.
How to start and stop the ATS Attachment Store
The ATS attachment Store is installed as Windows service, which can be started, stopped and restarted using the Windows Services Manager application.